Thursday, September 24, 2009

How to Backup/Restore using STSADM command

The STSADM command is used for backing up and restoring site collections. You can use this command to take the backup with full functionality and restore to new site collection. The way to backup and restore a SharePoint site using this command is:

  • Stsadm –o backup –url -filename
  • And then at a later date you can restore the site using
  • Stsadm –o restore –url -filename

Backup a Site Collection:

  • On your SharePoint server hit WINDOWS + R.
  • Type “cmd” and click OK.
  • In the cmd window navigate to the “C:\Program files\common files\microsoft shared\web server extensions\12\bin” directory.
  • Type stsadm -o backup -url “http://Server001/demo” -filename “C:\MyFirstBackup.bak” -overwrite
  • Press Enter

When the backup is completed it will now be sitting in your C:\ with the name MyFirstBackup.bak.

At this point you can copy the file to the other server, or just perform the restore on the same server by following the steps below.

Note before restoring ensure that the target site collection you are restoring onto is a BLANK site. This will allow you to avoid some potential issues with duplicate names and ID’s.

Restore a Site Collection:

  • On your SharePoint server hit WINDOWS + R.
  • Type “cmd” and click OK.
  • In the cmd window navigate to the “C:\Program files\common files\microsoft shared\web server extensions\12\bin” directory.
  • Type stsadm -o restore -url “http://Server001/Newsite” -filename “C:\MyFirstBackup.bak” -overwrite
  • Press Enter

When the restore is complete the site collection should now be replicated, or restored.

Note: STSADM is not user friendly with error messages. Check the Application Event Log. The message received in the command window may not be indicative of the true problem.

Friday, September 4, 2009

Optimizing SharePoint search using Managed Properties

I would like to discuss about Optimizing SharePoint search using Managed Properties by configuring the Properties to appear in the Advanced Search. Here are the steps to create Managed Properties and configure it in MOSS 2007 Advanced Search.

1. Go to the central administration -> Shared Services


2. Under the Search Menu, click on Search Settings.

3. In the Configure Search Settings page, click on Metadata Property Mappings.


4. In the Metadata Property Mappings page, click on New Managed Property


5. Enter the Property Name and add the crawled properties that you want to add by clicking on the Add mappings button.


6. Click OK.

Once you have created the new custom managed property, go to the Advanced Search page.
1. Click on Site Settings and then on "Edit Page"
2. Click on Edit Menu of the Webpart and then Select "Modify Shared Web part"
In the Advanced Search Box Pane, click on the Properties Menu and then select the content in the Properties Text Box. In order that your Managed Properties appears in the Properties lists, you need to make changes in the XML file content.


The XML File in Properties has the following structure:
  • Find the string:
  • <PropertyDef Name="ModifiedBy" DataType="text"
    DisplayName="Last Modified By"/>
  • Add the following String below it:
    <PropertyDef Name="MyProperty" DataType="text" DisplayName="MyProperty"/>
  • MyProperty denotes the managed property that was created in Search Settings in the Shared Services.
  • Find the ResultType node:
    <ResultType DisplayName="All Results" Name="default">
  • Add the following string below this:
    <PropertyRef Name="MyProperty" />
  • Now you can click on Apply and OK to close the pane.

The property "MyProperty" will appear in the Property list box when All Results is selected.

Wednesday, September 2, 2009

SharePoint Maximum File Upload Size

SharePoint 2007 by default allows a maximum file size of 50MB that can be uploaded into any document library. This might be too much as you might not want users downloading 50MB files over your LAN/WAN. To change the maximum file size, here is the approach:

Increase the maximum upload size:
  • Click Start, point to All Programs, point to Administrative Tools, and then click SharePoint Central Administration.
  • Under Virtual Server Configuration, click Configure virtual server settings. On the Virtual Server List page, click the virtual server that you want to change.
  • On the Virtual Server Settings page, under Virtual Server Management, click Virtual server general settings.
  • Under Maximum upload size, type the maximum file size in megabytes that you want, and then click OK. You can specify a maximum file size up to 2,047 megabytes.

If you increase the file size limit, your site might occassionally time out for users while they are uploading files. To accomodate this increase the default time out property for IIS. Here are the steps to increase the connection time-out settings:

Increase the connection time-out setting

By default, the IIS connection time-out setting is 120 seconds. To increase the connection time-out setting, follow these steps:

  • Click Start, point to All Programs, point to Administrative Tools, and then click Internet Information Services (IIS) Manager.
  • Right-click the virtual server that you want to configure, and then click Properties.
  • Click the Web Site tab. Under Connections, type the number of seconds that you want in the Connection time-out box, and then click OK.

Monday, August 31, 2009

Redirect SharePoint Site to New Location/URL

If you have requirement to redirect SharePoint users to new URL. Here is the step by step approach on creating a site redirect using Content Editor Web Part (CWEP) and JavaScript:

Here is the approach:

Create a subsite or new site collection in the same server or in other server. Once your subsite or new site collection is ready, make the page simple by removing all existing web parts and follow the below mentioned steps.

1. Click on “Site Actions” > “Edit Page”

2. Add Content Editor Web Part (CEWP) to a zone of your choice by clicking on “Add a Web Part”

3. This will bring up “Add Web Parts – Webpage Dialog” windows

4. If you don’t see “Content Editor Web Part” expand “All Web Parts” and it’s usually under “Miscellaneous” section

5. Tick “Content Editor Web Part” and click on “Add” button

6. Add content to CEWP either by clicking “open the tool pane” link or edit > Modify Shared Web Part

7. The previous step will open the Web Part properties in the right pane of the page. Click on “Source Editor” button

8. “Text Entry – Webpage Dialog” Window will open with blank page

9. Add the following JavaScript to “Text Entry – Webpage Dialog” window and click “Save” button.

<Html>
<head>
<script language="JavaScript">
</script>
<meta http-equiv="refresh" content="10;url=http://servername:3333/.../[subusite]">
</head>
<body>
"Provide the Information you want to read the users"<a href=http://servername:3333/.../[subusite]>Click here to Continue>/a>
</body>
</html>

10. Users will be directed to the new URL in 10 seconds (in the above script it’s 10 seconds. This value can be modified by changing content="10 value based on the content to be read on the page.)

Saturday, August 29, 2009

SharePoint Approval Workflow Vs Outlook Voting

Approval and Routing of Documents via Outlook Voting:

SharePoint workflows are being recommended for the Business process and under the assumption that such a recommendation will not be timely in its implementation, a contingency method for routing and approval of documents has been developed. This method involves the use of Outlook as a means to transport the document with the addition of “voting buttons” to indicate the approval of different parties involved in the transaction.

Pros:

  • Easy to configure and retrieve the results
  • Request a delivery receipt for the message
  • Request a Read receipt for the message
  • Set an expiration date for the message

Cons:

  • Outlook voting involves manual process for each and every document approval configuration
  • The voting results are only available in Outlook of a specific user
  • User has to verify the results manually and take a decision to Approve or Reject the document
  • Not possible to set remainder or due date for response.

SharePoint Approval Workflow:

A SharePoint workflow is the automated movement of documents or items through a sequence of actions or tasks that are related to a business process. I would define a workflow as a business process, a chain of steps that need to be performed in order to accomplish a goal. Out of the box SharePoint has the below mentioned workflow availability.

MOSS 2007 Workflow Availability:

  • Approval (Serial\Parallel)
  • Collect Feedback
  • Collect Signatures (Serial\Parallel)
  • Disposition Approval

Approval Workflow:

The Approval workflow routes a document or item that is saved to a list or library to a group of people for approval. By default, the Serial Approval workflow is associated with Document Content Types.

Pros:

  • Possible to configure the workflow to a Content Types, Lists or Document Libraries
  • Reuse the same workflow configuration for all documents or list items
  • Start an Approval workflow directly from a document or item in a list or library
  • Have an option to Stat an Approval workflow when a new item is created or changed in the list or document library
  • The server assigns tasks to all individual participants or a group.
  • Easy to track the task status and available on the server
  • The server sends e-mail alerts to all participants and remainders after the due date
  • Participants can click a link in the e-mail task alert to open the document or item to be approved
  • Participants can choose to approve, reject, or reassign their approval tasks
  • While the workflow is in progress, the workflow owner or the workflow participants can view the Workflow Status page to see which participants have completed their workflow tasks
  • When the workflow participants complete their workflow tasks, the workflow ends, and the workflow owner is automatically notified that the workflow is complete

Cons:

  • Not possible to request a delivery receipt for the message
  • Not possible to request a Read receipt for the message

Wednesday, April 1, 2009

Link to a Document Content Type SharePoint 2007 – Sending in a email message is not working

Link to a Document is one of the powerful features of SharePoint 2007. Unfortunately I am facing a wired error while using the Link to a document content type. We use the Content Type “Link to a Document” to link to a document that could be stored in another document library.

Issue:

If I send the link of a LINK content type in an email message, the user cannot open the file by clicking on the link in the message (It is opening a blank document, presentation etc..based on file type). Copying and pasting this link in the browser works fine.

An example link:
http://portal1/sites/sales/DocumentLink/LinkToMasterDocument.aspx
This does not work(Opens blank document, presentation..etc.) if you click on it, but works if you cut and paste it in a browser.

Here are the steps which i followed to create a link content type:

If the document library where you want to use the “Link to a Document” hasn’t been setup to use Content Types, you’ll have to click Settings, Document Library Settings, there you’ll need to access the Advanced Settings.


We need to add a Content Type, but before we can do this we’ll have to tell our Document Library that it can make use of different Content Types. Select “Yes” for the “Allow management of Content Types“.


When you return to the Document Library Settings, you’ll see a new section called Content Types, this is where we’ll add a new Content Type, click “Add from exisiting Content Type“.


The content type we need is “Link to a Document“, add it here.


When you return to your Document Library and click new, you’ll see that you have a new option to choose from, “Link to a Document“.


Let’s make a link to a Document in another Document Library, click “Link to a Document”. You’ll have to enter a name for the Link and enter the path to the Document you want to link to.


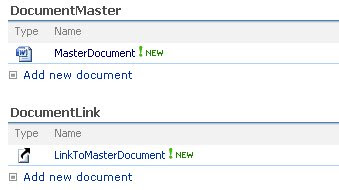
After confirming this is what your link looks like.


We made link to a document that’s saved in another document library, whenever you make a change to the master document, you don’t need to worry about the link, and it will point to the changed document.


Up to here it works fine. It’s really a good functionality. Here is the Issue.

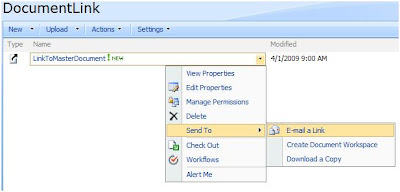
If I send the link of a “LinkToMasterDocument” in an email message, the user cannot open the file by clicking on the link in the message. Copying and pasting this link in the browser works fine.

Here is the snapshot:


Email Message:


An example Link: http://portal1/sites/sales/DocumentLink/LinkToMasterDocument.aspx
This does not work if you click on it, but works if you cut and paste it in a browser.

I have tried this with different site collections, but none works.
Do you see a workaround for this?

Cheers!!!