I am creating a simple Add-In, which is available for all user of a machine.
VSTO Add-in Behavior:
VSTO Add-in Behavior:
Whenever the Add-in is being installed by the user, the add-in will be visible to that user of machine. (User based Add-in).
Issue:
VSTO Add-in is Active for the user who installed in the Trust Center and it will be "In-Active" state for all the other users of a machine.
Solution:
Solution:
We have to make the Add-in as Machine Level.
I am working on VSTO add-in development, recently I faced the above issue and I resolved it. I am going to write as simple Outlook add-in to display “Greetings Veera!” message to the user, when ever user opens Outlook 2007 and the Outlook add-in is available for all users of machine (Machine Level add-in).
Steps to create an Outlook add-in project
1) Start Visual Studio 2005.
2) On the File menu, point to New, and then click Project.
The New Project dialog box appears.
3) Expand the node for the programming language you want to work in
(Visual Basic), and then select the Office node.
The document-level project types appear in the Templates pane.
4) Expand the Office node. There are child nodes for the Office 2003
and Office 2007 add-in project templates.

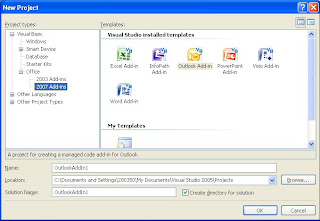
The New Project dialog showing Visual Studio Tools for Office templates
5) Select the Outlook Add-in template.
6) Accept the default name of Outlook1.
5) Select the Outlook Add-in template.
6) Accept the default name of Outlook1.
This will generate all the baseline code
necessary for your add-in. At this point, only the project code has been generated.
Visual Studio has not made any registry entries or security entries.
7) Press CTRL+F5 to test the add-in.
7) Press CTRL+F5 to test the add-in.
Visual Studio Tools for Office builds the add-in, registers it, sets up security for it, and starts Excel. Every time you rebuild the add-in, the registry entries and security will be re-deployed on the local machine. This is standard behavior for Visual Studio Tools for Office solutions to simplify deployment and testing on the development machine.
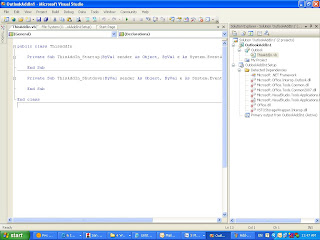
In Visual Studio, examine the project. In Project Explorer, you can see that the project wizard created two projects: a project for the add-in itself, and a Setup project. This is consistent with the way traditional “shared” add-in projects are created, as well as Visual Studio 2005 Tools for Office Outlook add-ins.
The project wizard has also added all the necessary references to the .NET, Office, and Visual Studio Tools for Office primary interop assemblies (PIAs), which support the strong-typing that Visual Studio Tools for Office add-ins use.
Finally, notice that Solution Explorer lists only one source file—ThisAddIn.vb. This file provides the standard Visual Studio Tools for Office Startup and Shutdown methods. You can put any initialization code you want into the Startup method, and any termination clean-up code you want into the Shutdown method.

Baseline code generated for an Outlook add-in (Visual Basic)
To add test code to the add-in
1) Type this line of code in the ThisAddIn_Startup method.
Private Sub ThisAddIn_Startup(ByVal sender As Object,_
ByVal e As System.EventArgs) Handles Me.Startup
MessageBox.Show("Greetings Veera!")
End Sub
2) Press CTRL+F5 to test-run the solution again. This time, when the add-in is loaded
Private Sub ThisAddIn_Startup(ByVal sender As Object,_
ByVal e As System.EventArgs) Handles Me.Startup
MessageBox.Show("Greetings Veera!")
End Sub
2) Press CTRL+F5 to test-run the solution again. This time, when the add-in is loaded
(just as Outlook is starting up), it will display the message box.
This article is targeted to provide the Approach for enabling the VSTO Add-in available for all the users (machine level).
Outlook Add-in needs to be “Full Trusted”, and then only the Outlook will load it. This Security can be set to the Add-in for either the Current User or the Current Machine. If we set the Security for the Current User, only the user who installed it can use the Add-in. If it is set to the current machine, then all the users will have access to the Add-in.
Deployment Procedure:
Signing the Assembly:
· In the Solution Explorer, right click the project and select Properties
· Select the Signing tab in the Properties pages.
· Select the Sign the assembly check box.
· In the Choose a strong name key file list, click.
· Type the name of the Project in the Key file name box.
· Type a password in the Enter password and Confirm password boxes.
· Click OK.
· Close the Properties pages.
· Select the Signing tab in the Properties pages.
· Select the Sign the assembly check box.
· In the Choose a strong name key file list, click
· Type the name of the Project in the Key file name box.
· Type a password in the Enter password and Confirm password boxes.
· Click OK.
· Close the Properties pages.
Add Prerequisites to the Setup Project:
· In Solution Explorer, right-click the Setup Project, and then click Properties.
· In the Property Pages dialog box, click Prerequisites.
· In the list of prerequisites, select the following items:
a. 2007 Microsoft Office Primary Interop Assemblies
b. Microsoft Visual Studio 2005 Tools for Office SE Runtime
· Select Microsoft Visual Studio 2005 Tools for Office Runtime Language Pack
if any users run your solutions with non–English settings for Windows. These users must
have the Visual Studio 2005 Tools for Office Language Pack to see runtime messages
in the same language as Windows.
· Click OK.
Add the SetSecurity Project to our Solution:
· Click OK.
Add the SetSecurity Project to our Solution:
I found a sample code (available in both C# and VB.NET) published here, which may be used to handle CAS programmatically. The author has excellently handled both Install and UnInstall in his code.
Follow these steps:
1) In your VS2005 Solution, add a new Class Library project.
2) Delete the default Class1.cs file created.
3) Add a new Installer Class (SetSecurity.vb)
2) Delete the default Class1.cs file created.
3) Add a new Installer Class (SetSecurity.vb)
Cut/paste the relevant code from sample into SetSecurity.vb that you just created.
Note: You will have to include the following 2 namespaces in the SetSecurity.vb class (which were missing)
Imports System.ComponentModel
Imports System.Security.Policy
Configure the PolicyLevel and PermissionSet in the code to your needs.
Private ReadOnly installPolicyLevel As String = "Machine"
Private ReadOnly namedPermissionSet As String = "FullTrust"
In the Outlook Setup project, the Primary output from SetSecurity project needs to be included and using the Custom Actions Editor you may add it as a Custom Action for Install and UnInstall as shown below.
Build the Outlook Setup project (which references both your security project and Outlook Add-in project) and Install them on the End-User machine.
Registry Keys Settings:
Outlook Scans the Registry Settings and identifies a list of Add-in's to be loaded, hence during Installation, Our Deployment project automatically creates the necessary Registry Keys in the HKEY_CURRENT_USER. But these Registry keys will be available only for the Current User and not for other users who log into the machine. We have to export the Registry keys from the Admin User (Who Installed the Add-in) and imported the same to the Normal User’s Registry. Now the Add-in
will available for Normal user.
Limitation:
The one limitation of this approach is we have to run a separate process in end user machine (Normal User account not an admin user) to copy the Registry keys from the admin user to normal user.


No comments:
Post a Comment